Monday, November 12, 2012

Mojo de Ajo Pizza with Blackened Chicken and Serrano Peppers

Mojo de Ajo Pizza with Blackened Chicken and Serrano Peppers


Remember our first post? Well now we're trying to show you how to make it rain Mojo de Ajo in different recipes.

There will be no leftovers when you make this pizza, especially if you make the dough, which is really easy. Don't roll your eyes. Shut up and make some fresh pizza dough.

FRESH DOUGH

Click Here

Do it.

PIZZA INGREDIENTS


1/2 cup Mojo de Ajo (see recipe)
2 chicken breasts halved lengthwise (like this)
4 tablespoons Emeril's Essence seasoning (or another blackening seasoning)
1 lb fresh mozzarella cheese, sliced
2 fresh roma tomatoes, sliced
4-6 fresh serrano peppers, diced
Extra mozzarella (if desired)
Salt and Pepper

1. After you've done you're culinary duty and MADE THE DOUGH, you can use a rolling pin, wine bottle, whipped cream can, PBR tall boy, or any cylindrical device to stretch the dough to the desired diameter that will match your pizza pan. You should all see by the pictures that I don't pretend to have worked in a pizza shop. So even if your dough ends up looking like Quasimodo made it, you'll love the way it tastes.

2. In the waiting stages of the dough, preheat your grill. Cut the chickens in half (see picture), season them with Emeril's Essence, and throw them on the grill for about 2-4 minutes on each side. When they're done, let them rest for a few minutes, then slice or dice 'em - however you want to bit into them on the pizza.

3. Preheat your oven to 450 degrees. Spread the Mojo on the pizza just like a pizza sauce. Rub a little extra on the crust if you can.

4. Layer the chicken, diced serranos, and sliced tomatoes on the pizza. Cover them with the slices of fresh mozzarella.

5. Sprinkle a nice size pinch of kosher salt on the pizza, as well as some pepper.

6. Bake at 450 degrees for 15-20 minutes. Take it out when the crust is golden, and the cheese is bubbly.

7. Let it cool for 5 minutes before slicing. Now EAT.


Sunday, October 21, 2012

Lamb and Beef Sliders with Beer Onions, Smoked Cheddar, and Horseradish Cream Sauce


Every man, woman, and child should be able to improvise a good burger recipe. Or you could make your friends think you're improvising by memorizing this powerhouse slider recipe. I literally surprised myself (and my roommate) with how good these were. Here's how to make it rain....

Ingredients:
1 lb each ground lamb and ground chuck
1 large sweet onion
3 tbls vegetable or grapeseed oil
2 tbls butter
2 tbls horseradish
1 cup sour cream
1/2 cup Red Ale
8 thick slices of smoked cheddar cheese
kosher salt and black pepper
8 Slider Buns

For the onions:
1. Heat the vegetable oil in a skillet on medium high.
2. Slice the onion and add to the skillet after it heats up. Cook for 5 minutes, stirring frequently so the onions don't burn.
3. Add the butter, some salt and pepper, and keep stirring. After another 5 minutes, add the beer and lower the heat to medium. Keep the onions cooking for another 10-15 minutes until they are brown and soft.

For the horseradish sauce:
1. Mix together the horseradish, sour cream, and some salt and pepper. Boom. Done.

For the burgers:
1. Preheat your grill to medium-high heat
2. In a mixing bowl, combine the ground lamb and chuck with a tablespoon of salt and some black pepper.
2. Form patties that are about a half-inch bigger than your slider buns - probably a quarter pound of meat for each burger.
3. Throw them on the grill, cooking each side for 3-5 minutes. In the last two minutes, put the smoked cheddar slices on each burger and close the lid of the grill.

Now you can form each burger. I leave it up to you how you want to stack the layers of flavor. We put burger, onions, then sauce, and stacked 'em nice and high. Let us know if you like this and any other variations you might ponder.

Thursday, October 4, 2012

Baja Fish Tacos!


This is the moment where I wish I could go back and retake some pictures, or just eat more of that meal.  I'm not gunna lie...it was pretty good.

Let's start easy and get into the more difficult stuff after.

Rice:
Start with about 1 Tbsp of butter
Add about 2 Tbsp of Lime Juice
Add 1 cup of white basmati
Add 2 cups water
watch the magic happen for 15-20 minutes (just taste test)
Turn off the heat
Add as much cilantro and lime juice as you want on top, then stir
Of course, don't forget to add more butter.


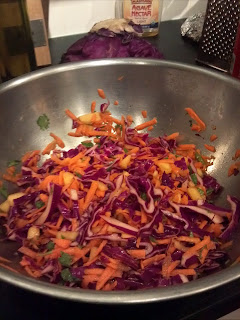
Slaw:
1/2 head of Purple Cabbage (shredded)
1 large Carrot (shredded)
1 firm Mango (diced)
Cilantro (to your taste)
Lime Juice (one whole lime)
1.5 Tbsp of Apple Cider Vinegar
1 Tbsp white sugar
2 Tbsp Olive Oil
Salt and Pepper to taste
Just mix everything together! So simple and so fresh and tasty!


Chipotle Cream:

obviously you can change the amounts and make half of this portion, but I love eating this with the rice too

1 cup sour cream
1/8-1/4th cup Heavy cream (depending on how thick or thin you want the sauce)
1 tsp PAPRIKA (we make a big deal out of this word when it's used in our blog)
1/2 tsp garlic powder
1 Tbsp lime juice
2 Tbsp Chipotle Chile (I got canned adobo)
Stick this in the food processor..and process it.

Some people prefer just putting the Chipotle Chile sauce in there, vs. putting a few of the actual peppers.  I love spicy food, so I put a pepper or two in the food processor too.

Fish:
Get your frying oil to about 350, once you stick the fish in there it'll be 5-7 minutes to cook.

Batter-
1 cup all-purpose flour
1 tsp salt
1 tsp black pepper
1 cup beer (really any will do)
1 tsp cayenne pepper

Mix together and let sit for 10-20 minutes

I got a few fillets of Mahi Mahi, because it was on sale at the market, but any firm fish will work.

cut the fish into long but thin strips (about 1.5 inches wide) it'll make it easier to put in the tacos

coat the fish strips in batter
gently place in the hot oil, turning every so often
place cooked fish on paper towel to soak up extra oil.


Then simply arrange your tacos!  You can put rice in the tacos too, or just put it on the plate and eat it separately.


I wrote this post in class and I am way too tired to be witty right now.  But I hope you enjoy this meal.


Monday, October 1, 2012

Tandoori Beer Can Chicken


Holy Tandoori, Batman....

Now that we've gotten all the puns out of the way, let me tell how crazy easy and wonderful and crowd-pleasing this is. It's crazy easy and wonderful and super crowd-pleasing. Let's not waste any more time staring at the delicious pictures or laughing at my awful humor.

Here's what you need:

1 4-5 lb whole chicken
1 jar of tandoori marinade (I like Patak's)
2 cans of american lager beer (the first is for cooking, the second is for drinking)

If you think there are more ingredients that end up showing later, you're wrong. You only need 3 things, people.

1. Preheat your grill on high. If you're using charcoal grill, set it up for medium heat.

2. Remove and discard the fat just inside the body cavities of the chicken. Remove the package of giblets, and throw them at whoever you're cooking with. Rinse the chicken, inside and out, under cold running water, then drain and blot dry, inside and out, with paper towels.

3. As liberally as you can, spread 4-5 tablespoons of the marinade on the chicken. Get it in all the nooks and crannies.

4. Open a can of beer, drink or pour out about 1/3 of the beer. With a church key opener, make another few holes on the top of the beer. Put a spoonful of the marinade inside the can of beer.

5. Slide the chicken upright onto the can of beer so it looks like it's sitting on it.

6. When you're ready to grill, place the chicken beer-can-side down and spread out the legs to make a kind of tripod on the grate. For both kinds of grill, make sure you're using indirect heat so don't place the chicken directly over the flames or charcoals. (For gas grills, you can just use one of the burners instead of both)

7. Turn the grill down to a little above medium, and cook for 2 hours until the chicken is toasty and beautiful.

8. Invite your neighbors, neighbors' dogs, friends, ex-lovers, and the like and enjoy this awesome recipe.

Thursday, September 13, 2012

Your More-Than-Everyday Marinara


Canning is hip, y'all. Read a book.
Making a big batch of marinara, canning it, and having it ready to go will save you more times than you know. You'll be able to use it for everything from french bread pizza to stuffed shells to chicken parmesan to that little extra freshness you need to accompany your Papa John's at 4am. This also happens to be a very cheap sauce to make...here goes:
Ingredients (for the big batch) - makes about 7-8 quarts
3 102oz cans of whole peeled roma tomatoes
4 oz fresh basil
1 lb garlic - peeled and roughly chopped
1-2 cups olive oil
1/2 cup granulated sugar
2 tbls ground cayenne pepper
3 cups red wine
salt and pepper
1. Get your big-ass pot on the stove. Turn the heat up to medium. Add olive and garlic. Saute for 2-3 minutes. Go ahead and stir frequently so the garlic doesn't burn.
2. Add the tomatoes, basil, sugar, cayenne pepper, and wine. Turn the heat up to full blast and let it get to a boil.
3. The next step has the potential to paint your kitchen red if you're not careful. Turn the heat down. If you have an immersion blender, stick it in the pot, and blend it all up. If you aren't rich, and don't have an immersion blender, then you'll have to puree the mixture in batches in your blender. Make sure you cover your blender with a towel each time you blend a batch otherwise it will spray everywhere (yes, that has happened to me)
4. Once it is all blended and back in the big pot, leave the heat on medium-high, and let the sauce boil/simmer for 1 hour. Towards the end of the hour, taste your delicious marinara, and add salt and pepper to taste.


After all that, you're free to serve it up to the neighborhood, or can it. If you look up canning instructions, the sauce should last 6-8 months unrefrigerated. Shoot us a comment if you've got questions and/or high praise.
Enjoy your homemade marinara.
 - Andy


Thursday, September 6, 2012

Grilled Top Sirloin with Mojo de Ajo


So this is our first official post on this blog, it was supposed to be Andy's post, but he is currently incapacitated and lying on the couch with a headache. We are 53% sure that it doesn't have to do with the food we just made, since I'm still going strong (we're very sarcastic people in case that isn't coming through to you).

This meal is so great for many different reasons, the main one being: resolutely being able to tell which of your friends are vampires.

The recipe for the Mojo de Ajo is actually quite simple:

Ingredients:

4 bulbs of garlic - peeled (about 2 cups of peeled cloves)
2 cups of olive oil
juice from 2 limes
1/2 tablespoon crushed red pepper flakes
1/2 tablespoon kosher salt

Preheat oven to 325 degrees. Mix garlic, olive oil, and kosher salt in a 9x9 baking dish or something similar. You need enough olive oil to cover most of the garlic cloves.


When the oven is ready, bake the garlic mixture for 40 minutes. During these 40 minutes, you might have the whole neighborhood come over to see what the hell smells so good. Don't give in to their madness. After 40 minutes, take the dish out of the oven. Add the lime juice and red pepper flakes. Mash the mixture with a potato masher or something similar. Give it a quick stir, and place back in the oven for another 20 minutes.


Now we can prep the steak and anything else you want to grill. Here's what we did:

Top Sirloin Steak
2 tomatoes - halved
2 ears of corn
2 limes - halved

Sprinkle everything with salt and pepper - very liberally. Since I had some mojo de ajo already prepared, I put some of that heavenly garlic oil on the veggies and steak before grilling, too. For a medium rare steak, we grilled the sirloin for about 6-7 minutes on each side.

We ended up with a child-like euphoria after eating this meal. And since, I have added mojo de ajo to everything save my coffee and cereal in the morning. We'll probably use the mojo in the future for another dish, so make a big mason jar of it. Stick it in the back of the fridge, and have it ready for next time. You'll be glad you did.